ray...
 The Happy Nada Farmer, moving at light speed, and doing quite well, for a cripple. But so many have it so much worse than I do, so who am I to complain??? Keep smiling!
Keep coming back, page Seventy Three follows......soon.
Ray McCune's Website
******** (if the banner nearly fills the top, that's the best width for viewing, so I can avoid framesIf this line is straight it is the proper page width) ****************
Since I wrote about what is really happening, has been nearly a year, so we have a lot of catching up to do. Hang on here we go!
The last I wrote was about the bobcat repairs and the kids weekend, that's so last year! And yet, the bobcat blew a line again, I replaced another 5 hoses and quarts of oil and put it right back to use! only about 3 hoses left, but I can wait...
Back to the basement saga! We left the house hanging over an open hole, the first concern was to get a west wall up so that it couldn't fall too far if it did, of course as I state before, I had system backed by system to support it, adjusta posts, tree trunks and hydraulic jacks along with straps and clamps to hold beams in place in case anything shifted. .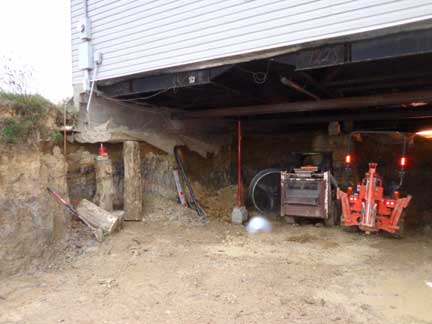
I need to explain a little more about the issues I had while trying to dig it, so here's a little more about that. While digging the area under the house out, I did my best to support the house above as much as possible, because, I had to live in it of course. So, what do you use to support tons of house and cement and failing preexisting foundation? Well I decided the use of tree trunks would be appropriate as they had been used for centuries when digging mines and tunnels. Circled in yellow is a 5 foot section of a hickory tree I cut up when it fell into "the back 40" during a wind storm. On top of it is a piece of a 2 by 8, that I wedged in to make it fit tightly. The red circle is the failing foundation. Now that was both a problem and a blessing, in that it had no rebar in it! The lack of rebar, allowing it to break on the west side of the house was noted a few years back. I noticed the block, forming the curtain wall,
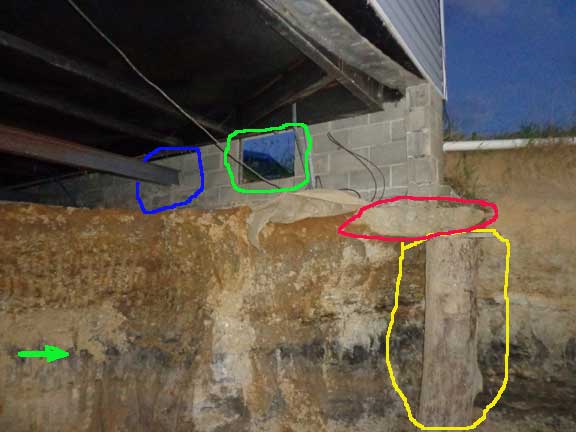 was broken and shifting. This is where I started digging assuming there was a bad splice in the reinforcing rods, or they had broken in some manner, What I found was the entire existing foundation contained NO steel reinforcement of any type. Now this was good/ convenient in the areas I had to break the foundation into chunks to remove them, but a problem when I needed it to continue to hold up the existing walls... Again more on that later. Meanwhile the green circle was the sole access to the under house area. this was cause for many unfortunate trips under due to issues with the water supply for the first 9 years. The blue circle is to highlight the method employed to support the house before we changed it. The I beams the house sets on, are simply sitting on a solid 4 inch block socketed into the wall, with the steel framework under the house, placed on it.
The green arrow is pointing to the coal layer that separates the brown clay from the blue clay. And as you may already know, clay is normally heavy, but the blue clay is brutal. The Bobcat couldn't carry a bucket full, until I added the 150 pound weight to the back door, and I (230#) needed to stay in it as well.
The steel frame work under the house is rather easy to see as well. I accepted the need to support the frame work as we dug it out, and the sooner it was supported on a substantial block column, the better I felt.
 I felt pretty good about it most of the time. Most of the time. Roy did get a little ahead of me at a couple points. He is an amazing worker. I can't complain about anything that was done, as it all worked better than I had hoped, and expected. It was a little testy a couple times though when his accuracy nearly outstripped my ability to work around his efforts. To Whit, the North West Corner. This is basically the way it was, and he laid up an entire wall, right up to the remaining foundation.This is the view after I was successful, I was a little busy to get too many pictures while this was going on as you can see in the next couple pictures.
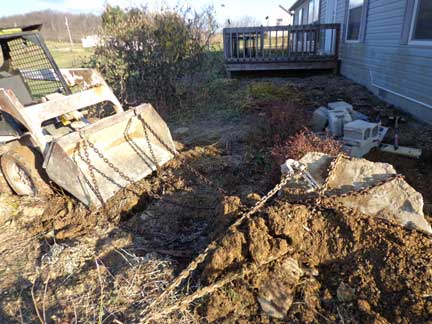 He laid the block work so close to a major chunk of cement that was so large I couldn't be sure I could control it. Well, just look at the mess I concocted to get it out.
 Yep, that's good neighbor Jeff, who checked in on me regularly, and jumped in a couple times when the "going got hairy" ! I'm pretty sure he ran the winch attached to the big truck as I backed and pulled with the bobcat in order "not to touch" the fresh block wall. Which I was sure I had a picture of, at about 1/4 inch clearance! Roy did it, to punish me, for not having that area cleared out for his operations. Who knew he was such a fast block layer??? Anyway, I managed (obviously with help) not to touch the new wall, and remove the heavy chunk of concrete.
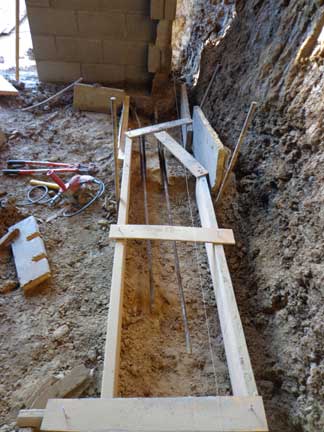 Next came a foundation for the north wall,well half of it, to the point of holding up the house properly. A column built in the wall, on a serious chunk of rock! Of course, there was talk of removing the rock, and pouring more foundation, my crazy idea was to cut the rock for rebar, and pour on it, as it was obviously a good piece to have under a foundation. And it saved a couple bags of concrete, which I'm all about! And it held the rebar up very nicely for this part of the pour. We were going to have the foundation all formed and have another truck of concrete come and pour it. But the weather got crappy, and the ground got bad, and a truck couldn't have gotten close enough to pour it anyway, so I Sakreted it.
Jeff showed up just in time to save me on that one as well. A truck delivered the pallet of Sakrete to the back yard, and we slid them down to the basement on a steel ramp, and replied them up. It was loads of fun! NOT!
The best way to form and pour a foundation is all at once for consistency and strength. Well, at least mine has rebar in it.
And, as it is basically on stone at this point, I wasn't, and am still, not concerned about the security of the walls resting on it. And the pour of the floor also locked the foundations in place at least they can't get closer to each other and they would have to move the entire front yard to get out so I'm pretty sure they are there to stay!
One tricky part of this was getting the base drain line in at a functional level, IE at the bottom of the foundation I did that with an entrenching tool, by hand, with the new shoulder, well, at least a couple swings..
The adjustapost on the right of this picture was destroyed a couple days later when the dirt behind it collapsed. It was the beginning of a very interesting series of collapses, that plagued me throughout the rest of the basement wall saga. The time period over which this project spanned was enough to allow for thermal expansion and contraction to play against me. But more about that later. The wide end on this pour, is where I created a base for the first of the four columns that ended up supporting the steel I beams that hold up the end of the house. These are in place of the "socketed 4 inch blocks" in the curtain wall." Much more stable and effective, at least in my opinion. There are so many stories to tell. So many things happened at the same time.
Mean while back at the ranch, it turns out I may have 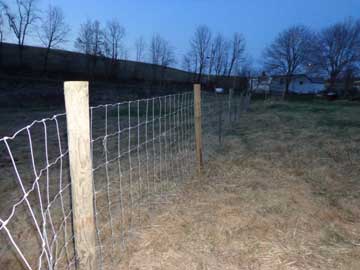 glossed over a little issue that is going to reoccur. You see, from time to time we have various animals in the fields, people need to leave something here for a month or two, or 6, for whatever reason. And as long as I don't have to deal with them, that's fine. Well, we had a need to add a little section of fence, to make it more restrictive for a couple horses, cause we have a fairly big garden now that we would rather not share with horses. So we put in another run of fencing. Basically no big deal, except when we where driving the last fence post. Yes, literally, the last fence post! Now I had cleared all the fence posts to make sure they were no where near any underground lines, I thought. Well, it turns out the water line from the spring house, to the little house, passed over a rock, right where we added a post to stabilize the gate. I mean, it all went so smoothly until the last "wham" on the fence post... And water started filling in around the post. We all knew what that meant, and I ran to the pump house to unplug the pump... Even with that, almost immediate, action. The hole filled with water pretty quickly, now I believe in making hay while the sun shines. So I decided it would be a good place to put a yard
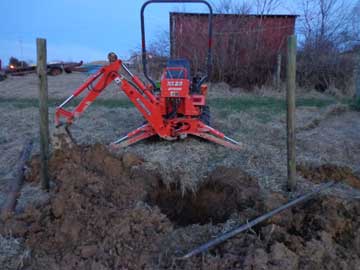
  hydrant.
You know, it was a place to anchor the line so I could find it easy in the future and it made it nice to have for the horses. Win Win! Plus, I got to use the little tractor to dig DOWN, for a change..
hydrant.
You know, it was a place to anchor the line so I could find it easy in the future and it made it nice to have for the horses. Win Win! Plus, I got to use the little tractor to dig DOWN, for a change..
I had, it turns out, to go and buy the hydrant, and the plumbing parts, the posts, the fence, and "the boarders" were going to build a couple gates for a fence run along the top of the hill area, and the help with installing the fence. Well, they did a great job with helping install the fence and... the number of horses just kept climbing, first there were going to be 3 then four and then 5 and I heard talk of a sixth, when I decided I was tired of waiting for the gates. And the fields just kept expanding and well it wasn't working out for me so well, so we parted on good terms and I decided there would be some rules next time. And figure, I still have to build the gates for the top of the hill.
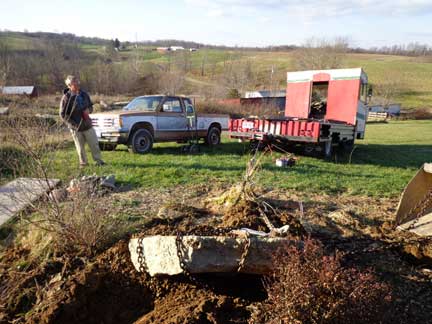
 This picture shows the two posts that went in without a hitch, and the position of the doomed post that caused the water issues. It's always water, I just don't understand! How many ways can water be a problem? I mean, I was a fire man for a couple years, and I know what a mess it was when the "water to the fire" wasn't going smoothly. But, I have too much water where I don't want it, and too little to none, where I do! Water! Water! Everywhere! And not a drop to drink! I thought it was a reference to sea water, but it fits here as well. But back to the topic at hand. I added a yard hydrant, and placed it in a well of stacked 5 gallon buckets and gravel, and a piece of perforated drain line, leading down hill from it, nothing drains well here, the clay is ridiculous, but so far it has worked out pretty well. DRY WELL that is.
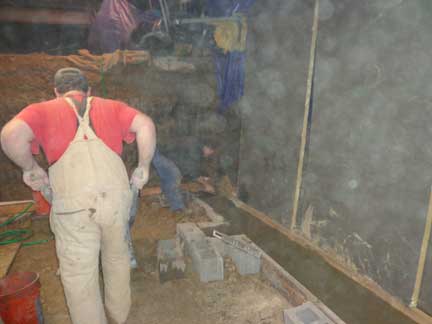
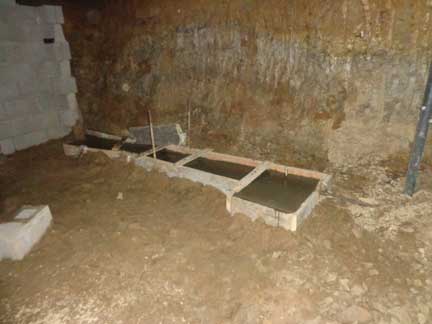
This is the best picture I have of the south wall footer, the black boards outside of it are styrofoam insulation, they are setting on the footer drain pipe, and Russ is wheeling the first load of the west footer. Roy is attempting to level it all out. And the temperature and humidity are the main cause of the crappy nature of the picture. Fortunately we all function pretty well at about 40 degrees when working, but that's not optimal for concrete and water. Consequently we were allowing a week in between pouring and putting blocks on the footer. Seemed like a great plan, after the boys went back up north, I'd fire up the heaters and cook the basement, well cook is an exaggeration, but heat it, to cure the concrete. This had an unanticipated consequence of course, as it seemed a great idea at the time...

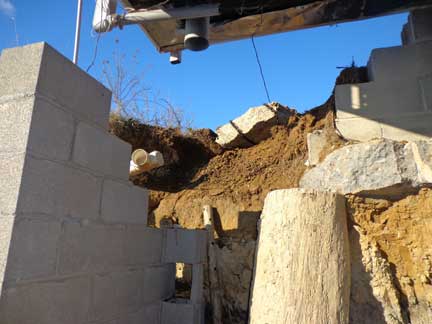
I had set blocks along the footer to gage the walls position, as a check against my plan, (for me, always a good idea) And as you can see, there was a heater (The orange and black shape under the fallen insulating panel and about 2 tons of clay) that had warmed the dirt surrounding the basement and caused it to become self mobilizing, or as they call it in other disciplines, a freakin cave in! It happened on Tuesday evening, as the heater had run from Sunday evening through Monday, and Tuesday evening around 6, when I went down to refuel the heaters, this is what I found... It took days to clean up, to clear the footer and cut the walls back far enough to allow the walls to be laid up without fear of their being pushed off the footer. It did make it "stupid hard" to waterproof the walls and get the drain pipes in place,,,,with gravel around them rather than clay, which would clearly defeat their intent...
But at this point I'm going to move to the next page as it just keeps getting more interesting, and more excitement is in the wind, or mud in this case... So maybe I'll move toward getting the next page up a little quicker, or maybe not, as there are current issues afoot as well. But until next page, Stay Safe and Have Fun...
The Happy Nada Farmer, moving at light speed, and doing quite well, for a cripple. But so many have it so much worse than I do, so who am I to complain??? Keep smiling!
Keep coming back, page Seventy Three follows......soon.