ray...
 The happy Nada Farmer, swishing through the tall grass to get to the woods to check the cameras and see if the wildlife really does dance in the moonlight as I suspect.
Keep coming back, page Forty five follows......soon.
The "Nada" Farm Chronicles
***************************************( if this line is straight and fills the top, that's the best width for viewing) *************************************
I have this Ford truck, it was obtained at a very agreeable price, thanks Curtis, and it had a few problems that needed to be solved to make it useable, thanks Haines, but it also had this awful creaking grinding noise when turning in 4 wd. Of course I ignored it, as it still worked, but then one day... When trying to turn in the field behind the house while dumping dirt for a particular water project. It stopped turning, actually, it stopped in a turn, and wouldn't straighten out. I got out to check because I was traveling at the top speed of about 10 miles and hour, so as not to slam my head against the the back window so hard when bouncing through the field. Now if this had happened on a trip to town at about 50 MPH, on the twisty hill roads I like to travel I would have been discovered next spring in the gully I landed in, so I wasn't too upset about it happening in the back yard, "ANYWAYS" The cross from the center of the universal joint from the right front four wheel drive mechanism was jammed in the axle so that it wouldn't turn back to straight. So, perpetual left turn.. not acceptable! I turned the wheel further left and removed the steel cross. TADA it was fixed, well maybe just not as stuck. The unfortunate (and mechanically stupid) plan I had to not worry about the creaking grinding sound had left me with a couple small problems. It's fortunate I'm a mechanical genius, but only because I was a mechanical idiot first.... Well, look what I had to do.
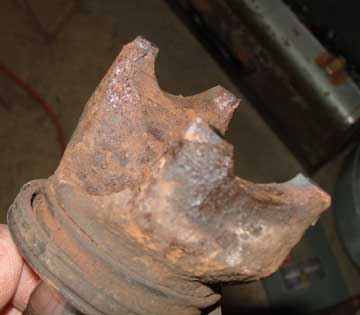
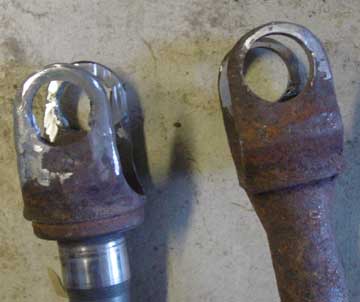
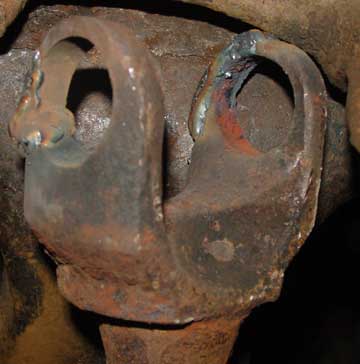 This is the long axle yoke, it is internal, runs from the front pumpkin to the right end of the front suspension, it was twisted and one of the hoops was broken, and needed to be welded, after I got it straightened, they both needed to be welded. The holes are supposed to be a press fit for the little bearing cups that hold the metal cross that makes it a universal joint. I found the cross. Remember it was stuck so the wheels wouldn't turn? But the bearing cups were gone, no loss, as they aren't reusable anyway. The bad part, I mean the really expensive part, oh hell it's all expensive. The next picture is not good news.... Because, as you can plainly see, both the hoops are gone, not just twisted but "freakin' gone baby", and pretty well "roughed up" to boot. The ballpark replacement price for this short shaft was $190.00 plus, (and I still haven't found anywhere to get one except a dealer special order and instead they sell both shafts with and installed universal for just under $300.00) I was starting to regret ignoring the grindy noise... But what the heck, I weld, I have machinery, I'm a machinist, and I have all the time in the world, well, a lot more time than money, so now I have a challenge! And I am fortunate that it is made of cast steel, rather than cast iron, so the welding will work. (I hate to braze, but that's another page altogether.) Oh, and I have a dozen other projects waiting, but due to the summer of water projects, they got put on hold. So all I have to do is bend some steel, make two perfect little hoops, weld them in place, and bore it out to a thousandth of an inch so the bearing cups press in, and make it small enough to fit through the hole in the front wheel carrier. Child's play!
Of course there is usually a challenge, or two, in everything I do. For one I had to get the universal joints so I'd know what size to bore the holes to, and I'd have to find a way to hold the shaft so I could bore straight down through it and cut the bores at a perfect 90 degrees to the shaft and in line so the universal isn't subjected to unnecessary wobble while working and so it wouldn't bind up when just turning the corners while not in four wheel drive. I think I did pretty well, guess I'll find out on the coldest snowiest winter day this January, which is when it will fail, if my luck runs true to form... But for now it looks pretty good.
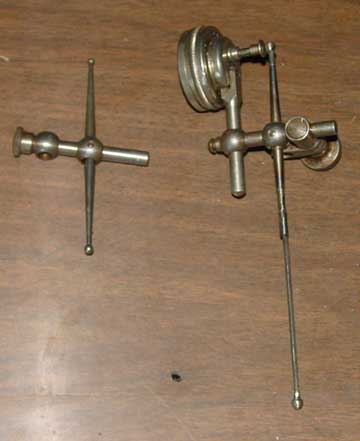 I did have to modify a measuring tool, because it was such a "deep reach" to align the rough holes. Fortunately, my dear father was a junk collector, he held onto good junk, you know, things that would have been discarded by other machinists, and probably were. So I had the vital part to modify to make the "deep hole" indicator I needed. On the left, is the standard length pivot, that allows the dial indicator to reach into a bore and give a reading, it is really only good for about a half inch of depth, which is usually sufficient for indicating single depth. But in this case, I needed to reach through the top loop, and through the bottom loop, to check for the 90 degrees to the main shaft, and check for a true vertical bore through both hoops. I used a small "allen wrench" for the extension, because they are a hardened, straight, and easy to weld to. The ball was missing from both ends, so I added it to the top and the bottom and hand ground them to allow for a good contact point at each end. The only thing wrong with this arrangement is, the reading is relative, not actual, the difference in the length of the arms makes the reading about two to one, but I didn't care to worry about that, I just needed to be able to indicate the center of both loops concurrently. And it worked quite well.
 The rough ground shafts are ready to go on the milling machine, and be indicated in for boring. I used the long shaft first, as it had more of the original bores, so I could check it more completely for alignment.

After I finally got them assembled, I painted them, just to slow the rust, and maybe help me remember that I had rebuilt them. Just for kicks I also replaced the ball joints and the front brake pads, I mean, I had it all apart anyway, so I might as well do what I can to make it last. I still have a couple parts to cut off and repair, but I needed to make a run to town to get fuel. So I slapped it back together and gave it a test run. Worked Okie Dokie.
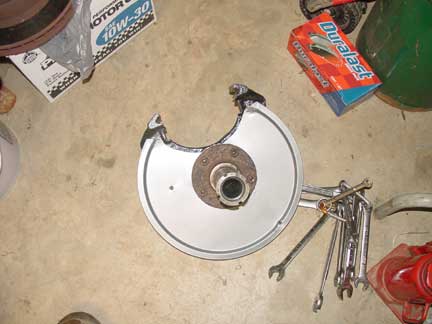 This is a Pizza pan, it costs $3.00. It is heat resistant, and has a special coating, it is also about the same size as the front brake discs on a Ford F150 pickup truck. The actual metal plate, that had rusted away costs, $111.00 to replace. I thought the Pizza pan was a good choice. We'll see if I made a mistake, but I'm guessing, that as the original rusted completely away and the truck still ran and stopped, the worst that can happen, is this thin sheet metal will make a scraping noise as it deteriorates, and in the mean time, it will deflect water from the brake disc and keep the dust off the wheels. And it's $108.00 cheaper than the Ford part.
I have a couple other projects, running concurrently. I tried to move the Leisure Lodge, and the starter made a popping noise and quit working. Turns out the solenoid blew it's cap, and suddenly the wiring wasn't connected to anything. And it wasn't going to heal or be repaired, fortunately I bought the lifetime starter when it fried the second one, so many years ago. So I removed the broken starter and took it to Auto Zone. 10 minutes later I was returning to the farm, with a new "rebuilt" starter. After about an hour of trying to get the wires connected back up, I finally got it installed. I don't bend like I used to, but who does? I got it running and moved it into the "in front" position at the garage, so I can remove the air conditioner and patch up the roof. I just need it to stop leaking long enough to dry out finally, it's rough but inhabitable, and it makes a good "tent" for hunting, at the back of the lot. I also have a gravely I fixed the starter on and a Rototiller I rebuilt the carb on but they both need further work to be reliable, but I needed to get the truck to town to buy gas, so It came first, well sort of. You see, I work on what I can do at the moment, and when I get parts, or time, or fuel, or an idea, I jump at whatever I can do the most to, at that moment. Some people think it makes me A.D.D. I think it allows me to function with no money, or parts, or time, in the most efficient manner, I do get obsessive occasionally, and try to stay on one job till it's done, but seldom can that work, I usually need a part or supply that means a run to town and I like to make multiple stops, rather than multiple trips. So I jump around quite a bit, in a three day period, and sometimes I do forget what it was I went to town to get for one project, but I usually got parts for three others and can progress on them anyway. So I'm not too concerned, just working in a constant state of flux and multitasking, which makes the days flow smoothly, and the nights too short...
Entry 2: Well it was over a week ago that I wrote the first part of this, so now I can report on some of what's up. Fortunately the second side of the front end on the Ford was just totally worn out, but hadn't started damaging anything yet and the correct "ball joint press" finally came in at Auto Zone, after two failed attempts to get it. What a zoo! With the correct tools a job is almost easy to do, and the second side of the four wheel project went smoothly. The major effort was in getting a grease gun that would reach all the new parts , it actually took three (each with a different tip arrangement) to get everything lubed. The universals I replaced had no grease fittings, the new ones do though they are unusual, and most folks won't have the correct tool to grease them, but I, of course, do. I always collect the weird little fittings I find, and oddly enough I usually know where they are. Even in my garage, contrary to some peoples opinion, though I have spent more time looking for things here, than I ever did at Lake Street, (well maybe ever did is a slight exaggeration), but more than I usually did anyhow. I also got the gravely and the rototiller fixed correctly, seems it's important to turn those screws out a couple turns after rebuilding the carbs and such, sort of inhibits the fuel flow when the needle valves are completely shut. Duh! I found out they both have healthy sparks, I wish the vicoden did more to dull that particular family of unwelcome sensations, man! that makes me jump every time. I also spent time working on the Leisure Lodge, I am amazed and appalled every time i have to try to seal it up again. Amazed at the methods and ideas they had for the construction of it, and appalled at how totally they failed at the simplest things. If they had used water proof glue, wolmanized wood, and stainless steel hardware to construct it, I think it would still be like new. Really, the way they laminated every part and put styrofoam insulation in so many areas of it, to keep it light, and make it thermally sound, was amazing. The method of sealing it was a total failure, they used wide strips of sealant (similar to plumbers putty) in 3/4" wide strips and just screwed through it it was placed with little regard to what points would seal best and just pressed between the metal trim strips and the metal outer coating. The addition of a colony of some really industrious "carpenter ants" didn't help. Between the ants and rot it is missing a great deal of it's original interior structure. All of it I have replaced has been with wolmanized lumber, which I have to rip to the same size as the original framing, from larger planks. I screw it all together, I don't have the giant fancy staplers they had, and I use stainless hardware everywhere I can. I've discovered that the glues I have used are pretty useless as I can't squeeze the parts together when they are in a structural position.They could press things together to assemble an entire wall, whereas I'm working in the middle of it from both sides, and can't apply pressure due to the size of the project. For example, I have tried to replace a piece of the roof that was rotted away. That's when I discovered the entire roof was made as one piece, well that's not literally correct, it was made of four layers of 1/16th inch plywood running in cross grain fashion, layered over 1/2 inch styrofoam insulation interspersed with structural members where the air conditioner, the roof vent, and the front clearance lights, and various other vent pipes were to need support or clearance to pass through the roof assembly and then 3 cross grain layers (1/16 inch) of plywood, and a finish sheet of light wood grain finish was attached and the entire assembly placed on the top of the vehicle, and over which a sheet of steel roofing was glued. This assembly was held in place by an angled aluminum trim strip that was sealed with the rolls of plumbers putty tape, and held in place with 3/4 inch long hex head screws every two inches. Now, add forty years of blazing sunlight, critters, rust and rot, and it is a leaky box on wheels.
Entry 3: As this has taken so long to get on the web I have had time to test some things I have produced here. The roof on the Leisure Lodge, seems well sealed, at least it hasn't been leaking openly for two weeks. Success! On the other hand, the Ford truck's front axle failed, the loops ripped right off again, spreading bearings and cups around the fields. (Remember the Genius statement?) So I will try again, with a different plan, using stainless steel welding rod this time rather than the simple method of Mig welding, which was convenient, but obviously not substantial enough for the stresses involved. I have found, thanks to the grand kid, a couple parts that are going to make it possible, to re attempt the repairs without buying any more parts. If this attempt fails I may have to buy the parts. That really grates on my cheap side. So here we go again. Rather than hold up publishing until it is done, I'll hold it for the future, mainly because it's the same operations just different materials in use, so it works or doesn't.
I also have been updating the Malfunction Junktion pages as the stories reoccur to me. But they do come slowly and I sometimes start with a particular end in mind, and it occasionally goes a different direction, puzzling, at least to me. Maybe I sometimes forget what I learned in a particular instance and sometimes I learn the same thing again, and again. SO, did I learn it, or not? I like to think I did, but have come at the problems from so many different directions that, though it is ultimately the same lesson, it is reinforced from a different situation. I suppose the most prevalent example is " FIRST think your way through the entire process", though sometimes there isn't time to even attempt a total "think through". Which is usually the one that really reinforces the need to do it. So I guess, the better plan would be, don't get in a situation where there isn't time to think first. Now, If I could only figure out how to make that work, I'd be set.... But then the only guy who gets the luxury of thinking it through entirely is the one who wasn't there, and didn't have to do it. In fact this is the most critical person, the one who second guesses, they always get it right! So I really don't count my hard won experiences as failures, at least not as quickly as those I have had to answer to, have. Because I was there, I did it, and I survived, who knows how they would have faired had it been them? But, I also don't want to be too tough on those who can't, or don't. They have boring lives and have to try to do something to justify their positions, however mundane and sad. WOW this went another direction, huh? Flashed back to those days in the Fire Service just for a minute there, whew, glad that passed... Think I'll go kick the goat.
The happy Nada Farmer, swishing through the tall grass to get to the woods to check the cameras and see if the wildlife really does dance in the moonlight as I suspect.
Keep coming back, page Forty five follows......soon.